In the world of networking, knowing how to find your MAC address in Windows 10 is an essential skill. Whether you’re troubleshooting network issues or setting up security filters, the Media Access Control (MAC) address of your device plays a crucial role.
In this comprehensive guide, we’ll explore the meaning of a MAC address, discover various methods to find it on a Windows 10 PC without using the Command Prompt, and learn how to locate devices by their MAC addresses.
By the end of this article, you’ll be equipped with the knowledge to navigate the networking terrain of Windows 10 confidently.
What is a MAC Address?
The MAC address, also known as the hardware address or physical address, is a unique identifier assigned to every network interface card (NIC) or network adapter in a device.
This 12-digit hexadecimal code serves as a way for network devices to distinguish each other on a local network. Unlike IP addresses that can change dynamically, a MAC address is typically hardcoded into the device’s hardware and remains static throughout its lifetime.
Read Also:
- Set CPU Priority To Prefer Foreground Apps Windows 8.1
- Windows Cannot be Installed to this Disk. The Selected Disk is of the GPT Partition Style
- Windows Resource Protection Found Corrupt Files But Was Unable To Fix Some of Them.
Knowing your device’s MAC address is vital for various networking tasks, such as network access control, setting up a secure Wi-Fi network, or troubleshooting network connectivity issues. In Windows 10, you can find your MAC address easily, and we’ll walk you through the process step by step.
How to Find Your Mac Address Windows 10
Your computer has something called a media access control (MAC) address, which is a unique identity. Both you and the network administrators will be able to view the devices that have connected to your computer. A MAC address is useful for claiming a stolen device that has been recovered.
Method 1: How to Find Your MAC Address Windows 10 with Command Prompt
Using the command prompt is the easiest method for locating the MAC address.
Step 1: Access the DOS prompt. Try typing “Command Prompt” into the taskbar search bar, or, if you’re using an older version of Windows, right-clicking the Start button and selecting Command Prompt from the menu.
Step 2: Enter ipconfig/all and hit enter. Your current network settings will be shown here.
Step 3: Find the actual location of your adapter, number three. To find your MAC address, scroll down to where it says “Physical Address” next to your network device.
Method 2: How to Find Your MAC Address Windows 10 with Command Prompt
Step 1: Locate “View network status and tasks” in the menu bar. (Alternatively, go to Settings > Network & Internet > Network & Sharing Center)
Step 2: Access your network by selecting it.
Step 3: Select the “Details” tab.
Step 4: Find the actual street address number four. In the Network Connection Details pane, your MAC address should be entered as the physical address.
Method 3: How to Find Your MAC Address Windows 10 Using Settings
Follow these procedures to discover the MAC address of a network card in Settings:
Step 1: Access the Preferences menu.
Step 2: Select the Internet and Network tab.
Step 3: Select either “Ethernet” or “Wi-Fi,” based on the type of network connection you’re using.
Step 4: Select the connection.
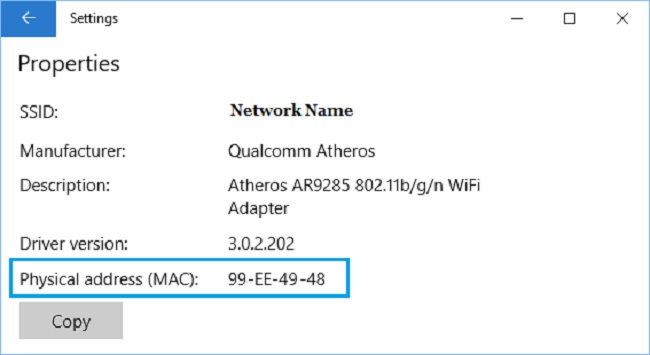
Step 5: Check the device’s physical address (MAC address) under “Properties.”
Step 6: By the end of the guide, you’ll know your computer’s network adapter’s unique MAC address.
Method 4: How to Find Your MAC Address Windows 10 Using Control Panel
Follow these directions to find the physical address of a network card in Windows 10’s System Settings:
Step 1: Get into the Settings menu in the Control Panel.
Step 2: Select Internet and Network from the menu.
Step 3: To access it, go to Settings > Network and Sharing Center.
Step 4: To modify the adapter settings, select the option to do so in the left navigation.
Step 5: Connect using Ethernet or Wi-Fi by double-clicking the corresponding adapter.
Step 6: A more in-depth explanation can be seen by selecting the Details option.
Step 7: It’s important to double check the network card’s MAC address.
Following these procedures, you’ll be able to utilize the network card’s physical address to identify a device on the router or restrict user access via the network’s settings.
Method 5: How to Find Your MAC Address Windows 10 Using System Information
The following instructions will show you how to see the MAC address without using the command prompt:
Step 1: To Begin With, a Door Must Open.
Step 2: Simply type “System Information” into the search bar and launch the program that comes up first.
Step 3: Increase the size of the Components sub-tree.
Step 4: Increase the Network offshoot.
Step 5: The Adapter menu choice should be made.
Step 6: Find the desired network interface card farther down the list.
Step 7: Verify the MAC address of the computer.
Following these procedures, you will be able to discover the network adapter’s media access control address.
How to Find MAC Address in Windows 10 (Without Using CMD)
Finding your MAC address in Windows 10 doesn’t always require delving into the Command Prompt. Here’s how you can discover it using the graphical user interface:
- Using Network & Internet Settings:
- Click on the Windows Start button and select “Settings” (the gear-shaped icon).
- In the Settings window, click on “Network & Internet.”
- On the left sidebar, choose “Wi-Fi” (or “Ethernet” if you’re using a wired connection).
- Under your active network connection, click on “Hardware properties.”
- Your MAC address, also referred to as the Physical Address, will be listed under the “Properties” section.
- Using System Information:
- Press the Windows key + R to open the Run dialog box.
- Type “msinfo32” and press Enter.
- In the System Information window, expand the “Components” category on the left sidebar.
- Select “Network” and then “Adapter.”
- Look for your network adapter in the right-hand pane and note the “MAC Address” value.
How to Find a Device by MAC Address
Finding a device by its MAC address can be helpful in scenarios like network monitoring or security. However, please note that it may not always be possible to pinpoint a device’s physical location or user identity solely based on its MAC address. Here’s how you can try to locate a device using its MAC address:
- Check Router Logs:
- Log in to your router’s web interface using a web browser. This typically requires entering the router’s IP address into the address bar.
- Look for a section that displays connected devices or logs.
- Identify the MAC address in question and see if it’s listed among the connected devices. Some routers provide device names along with MAC addresses.
- Use Network Scanning Tools:
- There are various network scanning tools available that can help you discover devices on your network by MAC address. Tools like “Angry IP Scanner” or “Advanced IP Scanner” allow you to search for devices based on their MAC addresses.
- Contact Your Network Administrator:
- If you’re in a business or organizational network, your network administrator may have access to advanced tools and logs that can help locate devices by MAC address.
Read Also:


