If I’m being completely honest, Minecraft wouldn’t have been enjoyable without the inclusion of anvils, which are one of the game’s most useful tools. Anvils have been crucial to the success of every player since their introduction in the game in the “Pretty Scary Update” back in October of 2012.
They serve a variety of purposes and may be easily configured, but how are Anvils created in Minecraft? Simply arrange 4 iron ingots and 3 iron blocks in a 3×3 crafting grid in the appropriate spots to create an anvil.
How To Make An Anvil in Minecraft
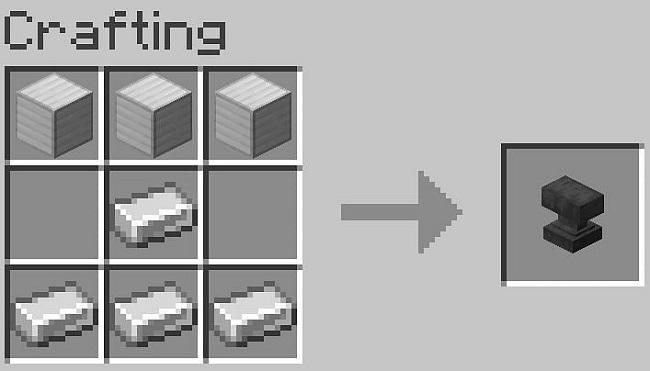
Iron blocks go on top, followed by Iron ingots on the bottom. Finally, put an iron ingot in the grid’s middle, and then grab the anvil you just made. Making an anvil from the get-go may not be the best use of your time and resources due to its high production cost.
Read Also:
- How To Make TNT in Minecraft
- How To Make A Furnace in Minecraft
- How To Make A Water Elevator in Minecraft
Therefore, rookie players typically hold off on equipping the greatest Enchantments for their armour, tools, and weapons until they are more experienced. Because of its unusual shape and the fact that it, along with gravel, sand, and the Dragon’s egg, falls when dropped from a height, an Anvil block is one of the few in Minecraft that is impacted by gravity.
Players can take damage from falling anvils, making them a potentially useful though pricey projectile. If the Anvil falls on a player from a height of 40 blocks, the hit damage might be as high as 20 hearts.
If you’re new to the game and don’t know anything about an anvil, don’t worry; I’ll be giving you a rundown of all you need to know about this handy tool.
Materials Needed to Construct an Anvil
As I mentioned before, Anvils can cost a significant penny if you’re just getting started in a Minecraft environment. However, in order to construct an anvil, you will need the following:
- Iron ore 31
- This is a blast furnace or furnace.
- Fuel (Charcoal, coal, etc) (Charcoal, coal, etc)
- Artistic workstation equipped with a table
Build an Anvil in Minecraft: Step-by-Step Instructions
The actual process of creating an anvil is not particularly challenging, but the preparation work leading up to it can be a real hassle. Normally, I would suggest that players in the early game find a hamlet and pray that someone there has an Anvil, but there is nothing wrong with learning how to construct one on your own.
Detailed instructions, including where to source the raw materials, are provided below so that you can forge your own own anvil.
Solution 1:
If you don’t already have a crafting table, you’ll need to construct one by cutting down some trees, then cutting those trees into wooden planks, and then cutting those planks into a crafting table.
This instruction manual will walk you through the steps of building a workbench for your crafting Endeavours.
Solution 2:
The next thing you’ll need to do is use the crafting table to construct a pickaxe out of wood or stone. You can construct a pickaxe by clicking on your crafting table, stacking a row of wooden blocks (or stone blocks, if you want) at the top, and then adding two sticks in the middle of the remaining rows, as seen in the image below.
Collect enough cobblestones with the pickaxe to construct a Furnace or Blast Furnace. In order to create a Furnace, you must use up all of the available Cobblestone slots on your crafting table.
Solution 3:
You’ll then need to get or mine some iron for the Anvil and some coal for use as a fire source. In order to Craft an Anvil, you will require a lot of iron (31 Iron ingots). Irons aren’t exactly common, but if you’re lucky you can discover a lot of them in caverns and Ravines, so you won’t have to spend too much time on this task.
The raw iron will not be extracted from the mine with a wooden pickaxe, but a stone pickaxe will. Finding coal allows you to fire up your furnace and transform your raw iron into usable ingots. If you want to get this work done, you’d better be ready to dig like crazy for coal.
However, you can utilise other fuel sources, such as charcoal or a lava bucket, if you’d rather not to go through the hassle of looking for both coal and iron. After gathering the 31 pieces of raw iron needed, you can turn them into usable iron ingots by heating them in a furnace.
Smelting raw iron requires clicking on your furnace, placing all 31 pieces of raw iron in the first cell, and the fuel source in the second cell. Then, you must wait for the progress bar to fill up before proceeding. After that, add the iron ingots that were melted down by clicking on them.
Alternatively, you can utilise a blast furnace, which functions similarly to a traditional furnace but can smelt metal at a rate twice as fast. Once you have acquired the necessary 31 iron ingots, you can begin making preparations to create the Anvil.
Tutorial: How to Assemble an Anvil
Solution 1:
Before you can begin crafting, you must first position your crafting table where you want it and then right-click on it to bring up the crafting grid interface.
Solution 2:
It takes three iron ingots to make one iron block, therefore if you require three iron blocks, you’ll need to fill up all nine cells on your crafting table.
Solution 3:
After acquiring the necessary materials, proceed to the crafting grid and arrange the three iron blocks so that they fill the full top row.
Solution 4:
Now, in the second row’s centre slot, place an iron ingot.
Solution 5:
After filling the full bottom row with iron ingots, a made Anvil will emerge in the crafted cell.
Solution 6:
Creating an Anvil is as simple as right-clicking on it and adding it to your inventory.
Read Also:
In Minecraft, Why Would You Need an Anvil?
In Minecraft, anvils have a variety of purposes; for instance, they are the only practical method for crafting items from Enchanted Books. It combines many weak weapons into one powerful weapon or tool, and it can be used to repair the durability of an enchanted weapon by fusing it with another enchanted weapon.
If you never forget to perform repairs when they’re needed, you can use an anvil to extend the life of your tools and weapons, and you can also use them to give them names.


