In Minecraft, water isn’t used for quenching thirst, but rather as a decorative element and a means of interacting with other blocks. Not only is it crucial in cobblestone and obsidian generators, but also in crop farms that can be used to feed cattle.
Using water as a means of transportation for monsters and players is a rather smart idea. Because of its peculiar interaction with fall damage and a few handpicked blocks, water can be used to construct elevators that whisk you swiftly from one location to another.
It’s also how a lot of mob farms get their creatures from the spawning room to the farming area. The water elevator, an inconspicuous device, and its operation are explained here.
What Is a Water Elevator in Minecraft?
In Minecraft, a water elevator is a clever mechanism that utilizes water and bubbles to transport players, items, or mobs vertically between different levels. Water elevators are an efficient and space-saving way to move up and down within the game, eliminating the need for ladders or traditional elevators.
Read Also:
- How To Make A Shield in Minecraft
- How To Make A Campfire in Minecraft
- How To Make A Composter in Minecraft
Minecraft Water Elevator Necessary Components
Building a water elevator is simple and inexpensive once you have discovered the Nether for the first time. The reason for this is that Soul Sand is used in the water elevator. What You’ll Need is…
- One Soul Sand Block
- Many kelps
- Any sort of slab
- To fill a bucket with water
- 2 indicators of any kind
- Personalized construction materials (here, glass is used as an example)
Construction of the Lift Cradle
The construction of the elevator shaft should begin first. You only need to excavate a long, single-block tunnel up to the level where you want your elevator to carry you if you’re building below ground.
You can think of the first shaft as an elevator to the upper levels.
Create a Focal Point
Make sure to construct a doorway at the elevator’s base that extends outward from the main shaft.
So that water doesn’t leak out of the elevator and into your base, this is crucial information to have later.
Full completion of the shaft is required, as is sealing of all shaft openings.
The entrance should be a two-block-high gateway, and water should only flow within the central tunnel that leads down to the entrance.
To Set Down Water
It’s time to utilise a time-tested method before you pour the water. Hang two wooden signs from the ceiling on either side of the entryway.
Full blocks of signs will stop the water from rushing through the opening and having a disastrous effect on the building.
Place your water supply at the top of the elevator shaft, up against the final block, which is also where you will escape.
After that, the water will naturally drain to the lowest level.
Get back down to the shaft’s base and double-check your work. When the water is flowing like this inside your elevator, between the two wooden signs on the entryway, it is ready for the next stage.
Put Down The Kelp
Every block inside the water elevator needs to be a water source block for it to function properly. Kelp can be used instead of the time-consuming method of carrying around a large number of water buckets and diving inside buildings to arbitrarily drop them.
Put kelp down from the bottom to the top of the water elevator.
Every piece of kelp you lay down will convert a block of flowing water into a block of water source. Now that you no longer need it, go to the elevator’s base and break the kelp there. After this is done, only the water source blocks in the shaft will be left.
Put Your Heart In The Sand
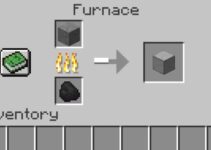
The next step is to replace the elevator’s base block with a Soul Sand block, which may be broken and replaced.
Your kelp elevator should be fully operational now if you followed the directions carefully. Take a ride in the elevator and see if the bubbles can carry you rapidly to the top.
If you find yourself trapped in the centre, pick up the Soul Sand and replace it with new kelp.
Create a descent
Now that you have completed your elevator ride to the upper level, you should consider returning to the ground. The procedure is much less time-consuming, and the layout is the same with the exception of water and wooden signage.
Making a new shaft is as easy as digging a hole next to your current one.
Build the stairwell’s exit close to the elevator’s, so that everyone can use it.
Just eliminate the requirement for wooden signage, and everything else may remain the same.
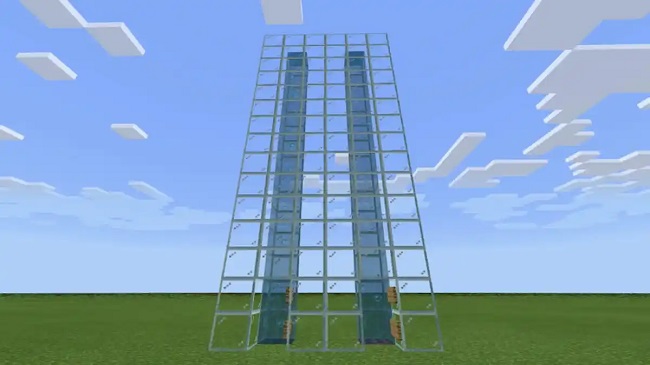
Complete the elevator shaft all the way to the very top. If the elevators have the appearance of two simple flower shapes connected at their centres by a petal, then you know you’ve got it right.
Check that there are no empty spots where monsters could appear.
Destroy the bottommost block in the elevator’s doorway and the bottommost block in the elevator itself at the bottom of your downward elevator. Place the slab you’ve chosen in the doorway and the bucket of water in the lift.
You can now safely jump off the building’s roof onto the water block below without taking any damage from the descent. Easy exit from the elevator is possible thanks to the slab’s forward-facing design, which eliminates the need to leap.
To add water to the shaft, place a Magma block at the base. When compared to Soul Sand, the Magma cube operates backwards. The downside is that it takes longer to finish using this approach.
Where Can You Use a Water Elevator in Minecraft?
Water elevators have a wide range of applications in Minecraft, offering players convenient and creative ways to traverse varying heights and depths. Here are some common scenarios where you can use a water elevator:
- Mining Operations: Water elevators are beneficial for miners, providing quick access to different mining levels or helping them ascend rapidly from deep underground.
- Mob Farms: Mob farms often use water elevators to transport mobs like zombies, skeletons, or drowned to specific collection points for easy item retrieval.
- Underwater Bases: Players constructing underwater bases can use water elevators to move between different levels while maintaining the underwater aesthetic.
- Navigating Ravines: When exploring ravines, caves, or ravines, water elevators help players ascend or descend safely without resorting to cumbersome staircases.
- Aesthetic Builds: Creative builders use water elevators as decorative elements in their structures, adding both functionality and visual appeal to their designs.
Some Easy Methods to Make a Water Elevator in Minecraft
Creating a water elevator in Minecraft involves using water and bubble columns to facilitate vertical movement. To construct a water elevator, follow these steps:
Step 1: Gather Materials
To make a basic water elevator, you will need the following materials:
- Water source blocks: You can obtain these by placing water buckets or breaking ice blocks.
- A building material of your choice to create the elevator shaft.
- A bucket to collect water.
Step 2: Design the Elevator Shaft
Design and build a vertical shaft using your chosen building material. Ensure it is tall enough to accommodate the height you wish to travel within the water elevator.
Step 3: Create Bubble Columns
To create a water elevator, you need to generate bubble columns within the shaft. Bubble columns are created by placing water source blocks and a soul sand block (or a magma block) within the water source.
- Upward Bubble Column: To make an upward bubble column, place soul sand at the bottom of the water source blocks. The bubbles generated will push entities upwards.
- Downward Bubble Column: To create a downward bubble column, use a magma block at the bottom of the water source blocks. This will suck entities downwards.
Step 4: Position Water Sources
Within the elevator shaft, position water source blocks at the desired entry and exit points of the elevator. These blocks will create the water flows necessary for the elevator.
Step 5: Test the Elevator
To test the water elevator, enter the water flow and experience the vertical movement. Adjust the bubble columns and water sources as needed to achieve the desired functionality.
Advanced Water Elevator Designs:
While the basic water elevator is simple and effective, players can create more complex designs using redstone mechanisms, observers, and additional features for enhanced functionality and aesthetics.
Read Also:

